Easy Homemade Applesauce Recipe with Freshly Picked Apples
There is nothing quite like coming home from apple picking with bags full of fresh apples, and then realizing just how many apples you picked! One of my favorite ways to use an abundant fall apple harvest is to make a batch of easy homemade applesauce.

Homemade applesauce is surprisingly simple to make. Fresh apples are slowly cooked until tender with a little cinnamon and just enough sweetness, then mashed or blended to make the applesauce as chunky or smooth as you like.
And don’t worry if your apple-picking basket contains several different varieties. A mixture of sweet and tart apples can make some of the best homemade applesauce.
In this guide, I’ll show you how to choose the best apples for applesauce, prepare and cook them, adjust the sweetness and texture, and store your finished applesauce. I’ll also share an optional method for preserving a larger apple harvest.

Ginger with Roots Tip!
You don’t have to wait until October to go apple picking. Many of the popular varieties like Honeycrisp are ready in August and September!

What are the Best Apples for Homemade Applesauce
One of the nice things about making homemade applesauce is that you don’t need a particular variety of apple. When we go apple picking, I don’t choose apples specifically for making applesauce. Whatever we pick at the orchard usually ends up going into the pot!
In fact, using a mixture of apple varieties can make especially flavorful applesauce. Sweet apples add natural sweetness, while tart apples give the sauce a little more depth and keep it from tasting overly sweet.
If you’re buying apples specifically for applesauce, varieties such as Gala, Fuji, Golden Delicious, Honeycrisp, McIntosh, Jonathan, and Granny Smith can all work well. Try combining two or three varieties rather than worrying about finding one perfect applesauce apple.
If you are using your apples for pies or crisps, stick to the crisp tart apples like Granny Smith, Pink Lady, and Honeycrisp.
If you are making jellies or apple butter, try tender apples like Fuji and Golden Delicious.
Ginger with Roots Tip!
If you’ve been apple picking, don’t overlook the bruised or less-than-perfect apples in your basket. As long as the apple is sound, simply cut away bruised or damaged areas before cooking. Applesauce is a great way to use the apples that aren’t pretty enough for the fruit bowl.
Do You Need to Use Cooking Apples?
No. Use the apples you have.
Some varieties soften more quickly than others, and that can affect the final texture, but applesauce is very forgiving. If your apples don’t break down completely as they cook, you can simply mash or blend them to get the consistency you prefer.
We tend to be all over the orchard when picking apples and usually have no idea what they are when we get home. Apple sauce works well with all the mixed up apples!
Ingredients for Homemade Applesauce
Just a few ingredients
Ginger with Roots Tip!
For every 2 pounds of apples (6-7 medium sized apples), you will make about 1 quart of applesauce.
How to Make Easy Homemade Applesauce
Making homemade applesauce is not complicated at all, but the canning process is a little more involved. I will guide you through the recipe and then provide you with the optional steps to preserve your applesauce afterwards.

Step 1: Gather Ingredients and Supplies
Gather your ingredients (and materials for canning if you want to preserve your applesauce).
Step 2: Wash and Peel Apples
Begin with a thorough washing and drying of all apples. Even though they were fresh picked, it does not mean that they were not sprayed with pesticides or fungicides at some point.
In my kitchen, I use an apple peeler/slicer/corer to prepare my apples. I also keep a sharp knife and cutting board on the side for additional chopping and for removing bruises.


Remember, this post is about easy homemade applesauce. The peeler/slicer/corer does the job quickly and easily! I highly recommend it!

Step 3: Wash all of your jars, bands and lids. Use brand new lids only.

If you are canning, start heating up the water bath on the stove now because it takes a long time to boil!
Step 4: Cook the Apples

- In a large pot, add your apple slices. I used about 4 pounds of apples for this recipe.
- Add 2-3 cups of water. Add more if needed to keep the applesauce consistency the way you prefer.
- These are optional, but I like to add 1/2 cup of granulated sugar and 1 teaspoon of ground cinnamon or apple pie spice blend.
- Simmer over medium-low heat until apples are tender and can be mashed easily.
Do You Need to Add Sugar to Applesauce?
Readers ask this question frequently and for good reason-why add extra unnecessary calories if we don’t have to do so, right?
The answer is “no”. You do not have to add applesauce to your recipe. Apples are naturally sweet-especially Fuji and Gala apples. If you are using a mix of unknown varieties or simply prefer an extra sweet applesauce, add the 1/2 cup that I suggest in my recipe.
How to Make Applesauce Chunky or Smooth
It seems like everyone has their own opinion about applesauce consistency. I personally like it somewhere in the middle of chunky and smooth.
In order to get the right consistency, mash with a potato masher repeatedly. You can also use an immersion blender to purée it even more if you like it smoother.
If you need to add some more water, now is a good time.
Ginger with Roots Tip!
Applesauce that is super chunky with very little liquid is more likely to have lots of unwanted bubbles and airspace in the jars. These jars should NOT be canned. Save those for the refrigerator and use within 1-2 weeks.

Step 5: Fill the Jars
Add your applesauce to clean sterilized jars with a clean ladle and funnel. Leave 1/2 inch headspace at the top of the jar.

- Wipe the rims of the jars with a clean rag or paper towel. Any sauce left on the rim will prevent a safe seal. So wipe the rim!
- Use a small rubber spatula and wipe down the inside of jars to remove any air bubbles.
- Add the lids and bands finger tight.
How to Store Homemade Applesauce
At this point, you can save your applesauce in the refrigerator for up to 10 days or freeze in the freezer for up to a year. The 1/2 inch headspace will allow for expansion in the freezer.
If you choose to can your applesauce, it can be stored safely in the pantry for up to one year.
Ginger with Roots Tip!
Write the expiration date (not the date you made it!) on the lid of the jar or storage container.
As with any home preserved foods, if you notice a suspicious smell, fuzzy growth, or discoloration- discard immediately.
How to Preserve Homemade Applesauce
Water bath canning is a process where you submerge the filled and sealed jars in boiling water for a certain amount of time. The heat kills bacteria and creates a vacuum sealed container for safe long term storage.
It is important to note that water bath canning instructions vary according to food, jar size and geographic elevation.
If this is your first time canning a food product, I highly recommend exploring the National Center for Home Food Preservation and following their exact instructions. The table below is based on their tested recommendations for homemade applesauce.
| Elevation | Pint Jars | Quart Jars |
|---|---|---|
| 0–1,000 ft | 15 minutes | 20 minutes |
| 1,001–3,000 ft | 20 minutes | 25 minutes |
| 3,001–6,000 ft | 20 minutes | 30 minutes |
| Above 6,000 ft | 25 minutes | 35 minutes |

Canning Tip: Processing times increase at higher elevations because water boils at a lower temperature as elevation increases. Always use the processing time for your elevation, and begin timing only after the water has returned to a full boil.
When your water bath is boiling at the right level, add the hot packed jars with gripping tongs and replace the pot lid. My pot’s lid has a special altitude gauge to let me know when the water is ready. I also use a wire rack with jar fittings for stability inside the pot.

- Process (boil in the pot) for the exact amount of time required for your jar size and elevation.
- Remove jars carefully with tongs and place on a clean towel or cutting board to cool.
- Check to make sure the metal lids are sucked down tight for a good seal. If it pops to the touch, add to the refrigerated jars or freeze. Do not store in the pantry. Otherwise, keep your homemade applesauce in the pantry for up to a year. Enjoy!

Equipment Links for Making Homemade Applesauce
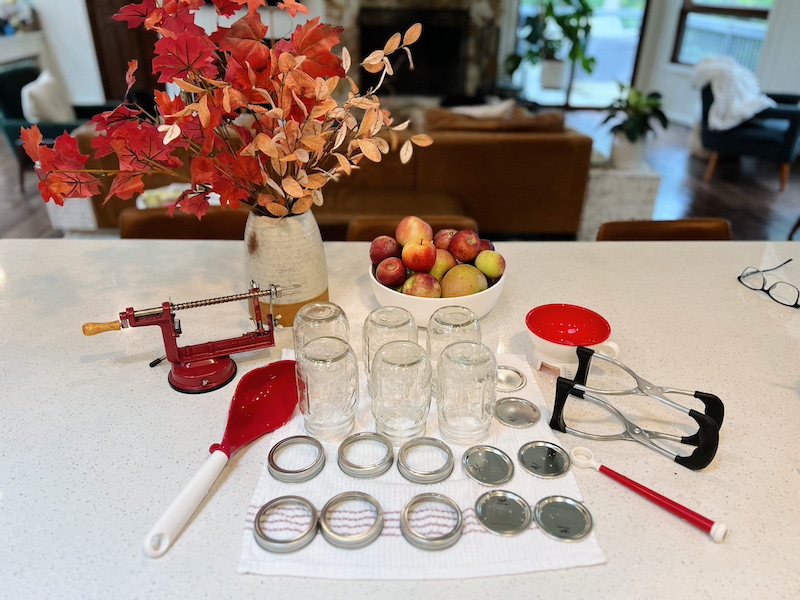
These are the products that I recommend using for making homemade applesauce and for water bath canning the jars.
- Victorio Canning Pot from Harvest Essentials. This is the pot that I have had for years. I couldn’t find it on Amazon, but this canning pot is similar if you prefer to shop through them. Again, I like the temperature gauge feature built into the lid.
- Reversible Canning Rack for holding jars securely in the water bath. Most canning pots come with a standard rack for use, but I like this one with the ‘flower petal’ design that allows you to keep small pint size jars stable. Flip it over and it holds quart size jars. Stack two of these racks together and you can process multiple small jars at once which is perfect for jams and jellies.
- Canning Scoop for ladling food into jars. This is more than a typical ladle. The pointed shape allows you to scoop along the inside of a pot and pour accurately into the jars.
- Canning Funnel for filling both wide mouth and regular mouth jars. I love this funnel because it sits securely on the jar AND it has headspace measurements on the bottom to see exactly where to stop filling your jars.
- Magnetic Lid Lifter for handling hot metal lids in boiling water. I spent years using tongs to try and grab the bands and lids out of the hot water only to watch them slip and slide back into the scalding hot water and under the rack. This handy tool makes it so much easier and safer!
- Ball Mason Jars for storing your food. I use the pint size jars with regular size mouth for my applesauce because we are empty nesters now and one 16 ounce jar is perfect for two. For larger batches, use quart size jars.
- Jar Lifter for safely adding and removing jars from hot water bath. This is a must have for canning. Those jars are hot!
- I also recommend keeping a copy of Ball Complete Book of Home Preserving on hand. I like that it opens flat and has plenty of recipes with great instructions.
Put all of these together for a wonderful gift basket for school auctions, Christmas, or birthdays!
Make it a Fall Tradition: Pick Your Own Apples
We have plenty of orchards to visit to here in the Upstate of South Carolina and nearby Western North Carolina.
Our favorites include:
Skytop Orchard in Flat Rock, NC
Skytop has the BEST apple cider doughnuts and plenty of apple varieties to pick. This family owned orchard is also very family oriented with farm animals, play areas, tractor rides and more.
Jeter Mountain Farm in Hendersonville, NC
Jeter Mountain Farm is a well appointed orchard providing visitors with a coffee shop, bakery, market and delicious barbecue.
Chattooga Belle Farm in Long Creek, SC
Chattooga Belle Farm is a gem of an orchard nestled at the base of the Blue Ridge Mountains. They offer much more than apples such as exotic fruits, berries, wines, and a distillery.
Tips for picking apples:
- Wear comfortable clothes and sturdy shoes.
- Go early in the season and early in the day to beat the crowds.
- Bring a cooler with water and snacks for the trip there and then use it to store apples and other goodies on the way home. Apple cider doughnuts, anyone?
- Be mindful of the orchard’s picking instructions. Stick to the U-Pick areas and try not to toss fruit on the ground.
- Be kind to the pollinators. Bees will be present in the orchard so be careful and respectful.
- Pick only ripe apples. They should detach easily from the tree with a simple twist and tug.
- Do not climb trees or pull branches down to reach an apple. Be safe!
Most orchards provide baskets for collecting and apple picking tools for the out of reach fruit. Or you can do like my husband (former collegiate lacrosse player) and use your old lacrosse stick!


Easy Homemade Applesauce
Equipment
- Canning pot
- Reversible canning rack
- Canning scoop
- Magnetic lid lifter
- Canning funnel
- Mason jars 2 quart size
- New lids for jars
- Jar lifter
Ingredients
- 4 pounds apples
- 1/2 cup water
- 1/2 cup granulated sugar optional
- 1 teaspoon ground cinnamon or apple pie spice
Instructions
- Begin with a thorough washing and drying of all apples.
- Wash all of your jars, bands and lids in hot soapy water or the dishwasher. Use brand new lids only.
- If you are canning, start heating up the water bath on the stove now because it takes a long time to boil!
- In a large pot, add your apple slices. I used about 4 pounds of apples for this recipe.
- Add 1/2cup of water to prevent apples from burning to the bottom of the pot. Add more if needed to keep the applesauce consistency the way you prefer.
- These are optional, but I like to add 1/2 cup of granulated sugar and 1 teaspoon of ground cinnamon.
- Simmer over medium-low heat until apples are tender and can be mashed easily.
- Mash and/or puree to your desired consistency. I like mine with a little chunkiness in it. If you need to add some more water, now is a good time. Applesauce that is super chunky with little liquid is more likely to have lots of unwanted bubbles and airspace in the jars and shouldn't be canned. Save those for the refrigerator and use within 10 days.
- Add your hot applesauce to clean jars with a clean ladle and funnel. Leave 1/2 inch headspace at the top of the jar.
- Wipe the rims of the jars with a clean rag or paper towel. Any sauce left on the rim will prevent a safe seal. So wipe the rim!
- Use a small rubber spatula and wipe down the inside of jars to remove any air bubbles.
- Add the lids and bands finger tight. (At this point, you can save your applesauce in the refrigerator for up to 10 days. Otherwise, proceed with the canning process).
- When your water bath is boiling at the right level, add the jars with gripping tongs and replace the pot lid. My pot’s lid has a special altitude gauge to let me know when the water is ready. I also use a wire rack with jar fittings for stability inside the pot.
- Process (boil in the pot) for 20 minutes or whatever your appropriate time is for your jar size and elevation.
- Remove jars carefully with tongs and place on clean towel or cutting board to cool.
- Check to make sure the metal lids are sucked down tight for a good seal. If it pops to the touch, add to the refrigerated jars. Do not store in the pantry. Otherwise, keep your homemade applesauce in the pantry for up to a year. Enjoy!
Notes
Making homemade applesauce may seem complicated, but it really is quite easy! I hope you have the opportunity to go apple picking and make some yummy homemade applesauce! Happy Fall Y’all!
For a more help gardening through the seasons, read my post:
The Homegrown Gardener’s Guide: Growing, Cooking and Living with the Seasons.
For more fall recipes, you might be interested in my post 10 Soup Recipes for Fall.

Use of the advice and information contained herein is at your sole choice and risk. You should not rely on this information as a substitute for, nor does it replace, professional medical advice, diagnosis, or treatment. Always consult your physician or healthcare provider before beginning any nutrition or exercise program. Read full disclosure here.